Executive Summary
When high winds tore through the Lehigh Valley in mid-April 2026, a residential property in postal code 18103 suffered significant shingle displacement along its roof hip and ridge junction — a structural vulnerability point where wind turbulence concentrates with destructive force. Harrisburg Restoration deployed an emergency mitigation crew the same day, completing full roof stabilization within hours of the initial loss notification. This case study documents the assessment, emergency tarping methodology, and innovative use of high-grip synthetic underlayment that protected the home’s interior from secondary water damage while providing a 90-day weather-rated patch for permanent repair scheduling.
“Roof hip and ridge failures demand more than standard tarping — they require engineered shingle-effect integration to redirect water flow and resist continued wind uplift.”
Project at a Glance
Sq Ft Mitigation Area
Same-Day Completion
Days Weather Rating
Interior Leaks Detected
Strategic Response: Why Minutes Matter in Wind Damage Mitigation
Storm-damaged roofs operate on a compressed timeline. Once shingles lift or tear away, the underlying decking and felt become directly exposed to UV degradation, wind-driven rain, and continued mechanical stress from gusts. Every hour an opening remains unprotected increases the probability of attic saturation, ceiling staining, insulation damage, and the cascade of secondary issues — including mold colonization within 24 to 48 hours of moisture intrusion.
The Critical Window
For wind-damaged residential roofs, the first 24 hours represent a decisive intervention window. Harrisburg Restoration’s emergency dispatch protocol prioritizes same-day arrival for active or imminent water intrusion scenarios, particularly when forecasts indicate continued precipitation or wind events. In this Lehigh Valley project, crews mobilized rapidly from the regional service network to deliver mitigation before the next weather front arrived.
Strategic Headquarters Location
Operating from postal code 17111 in south-central Pennsylvania, Harrisburg Restoration maintains regional coverage across the Lehigh Valley, Susquehanna corridor, and northeastern PA service zones. This distributed response model allows mitigation crews to reach Allentown-area properties for emergency stabilization work, supported by full-service reconstruction capabilities through the Advanced DRI network.
Understanding the Incident
The Source: Wind-Driven Shingle Displacement
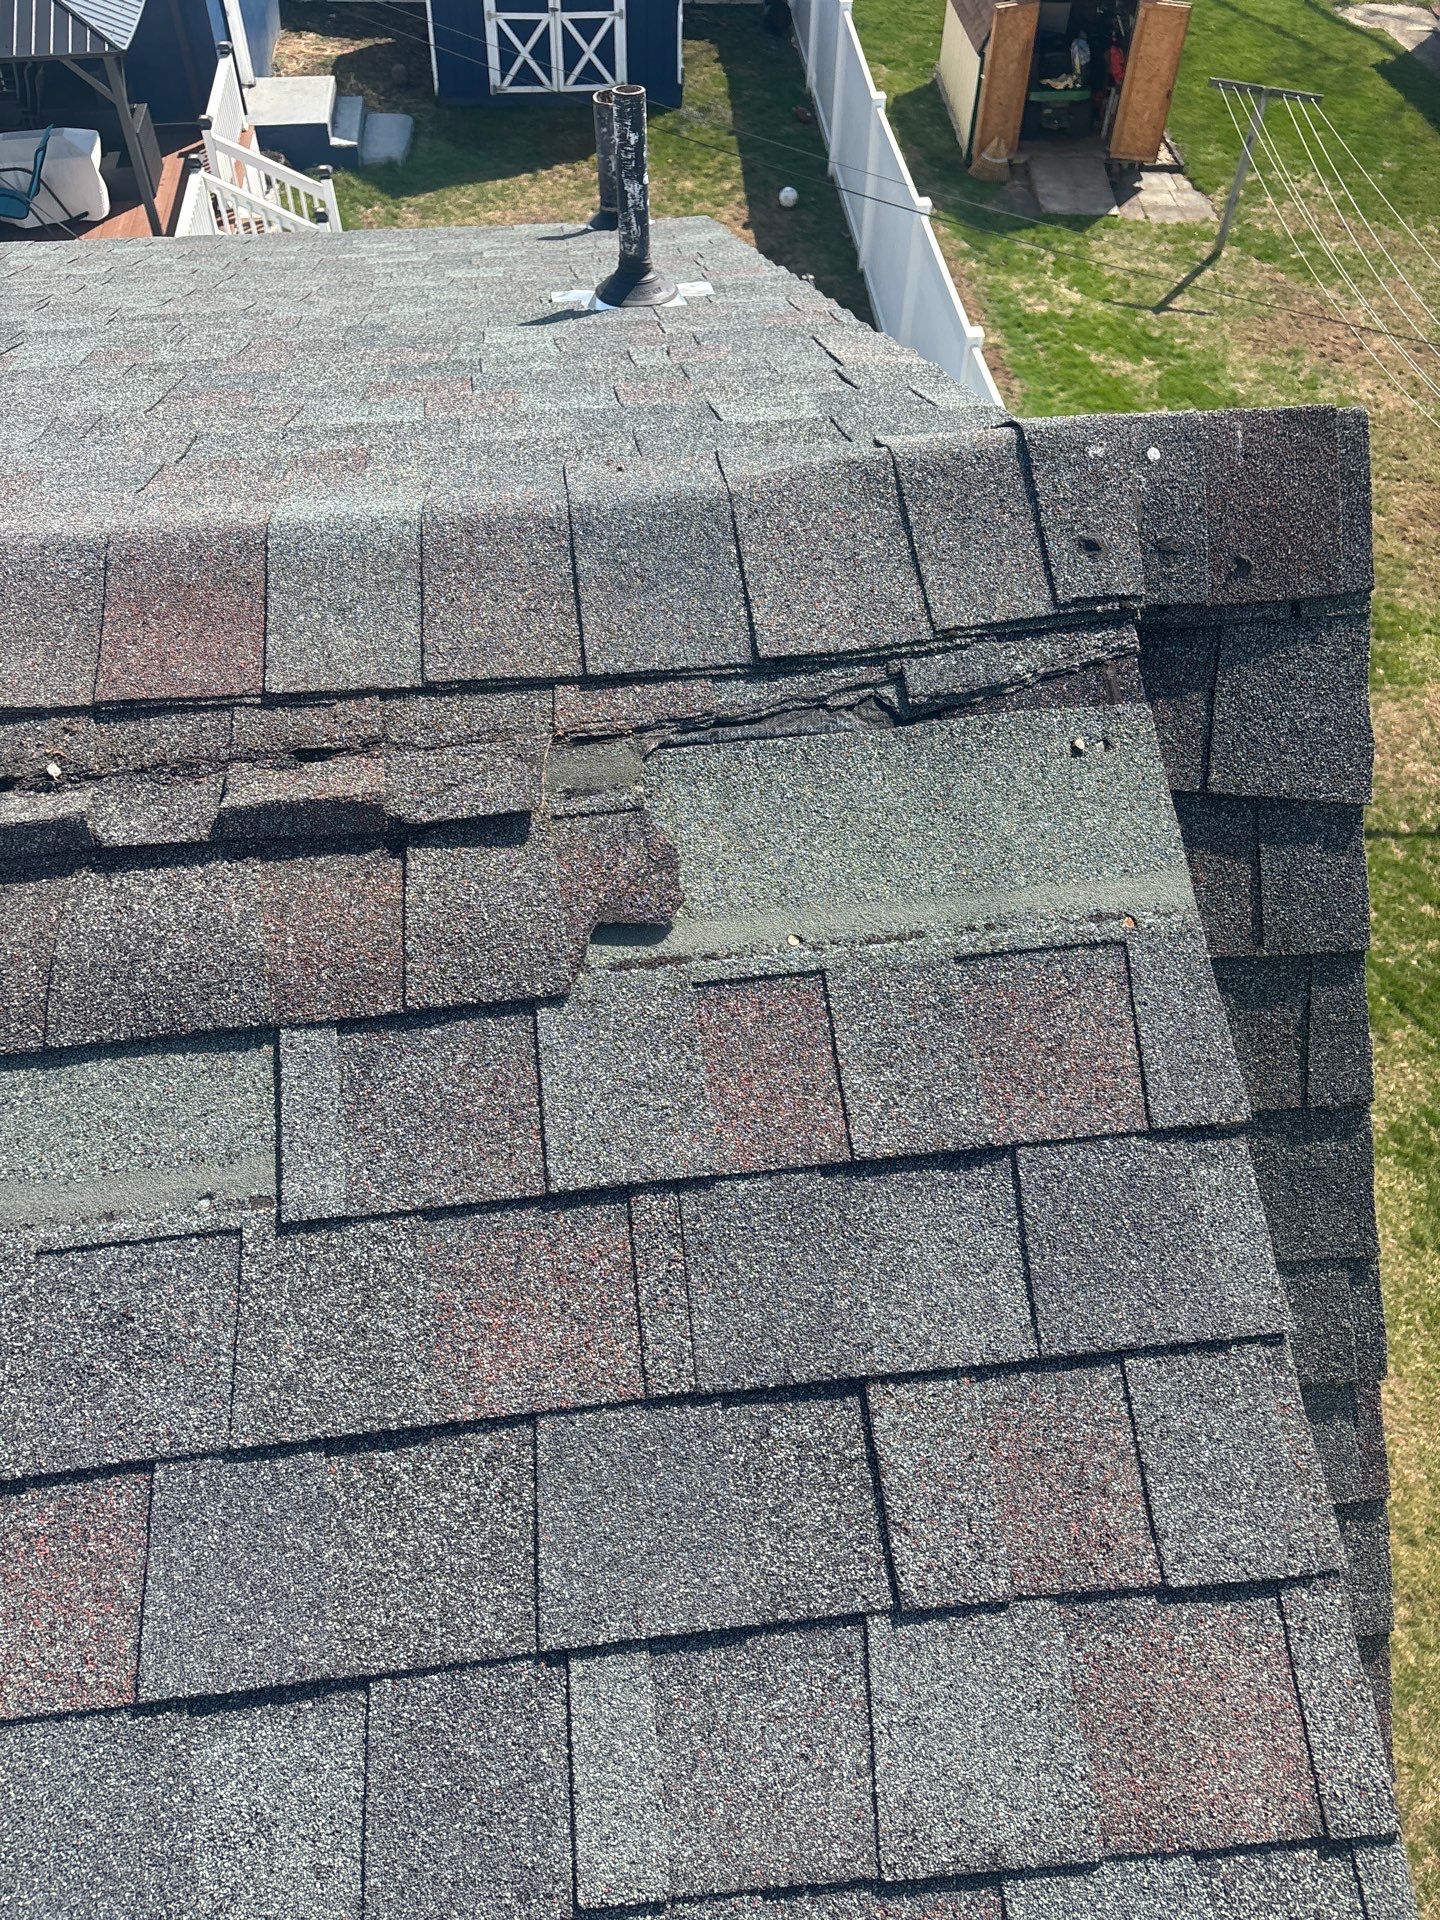
The damage profile observed on this property is characteristic of wind uplift failure at a roof hip — the diagonal line where two sloped roof planes intersect. Pre-mitigation photographs revealed multiple architectural shingles torn vertically along their factory perforation lines, ridge caps lifted and partially missing, and exposed nail penetrations creating direct water entry points into the underlayment and decking below.
Hip and ridge zones experience approximately 1.5 to 2 times the wind pressure of flat field shingles due to airflow acceleration over the roof peak. When shingle adhesive seals weaken — from age, manufacturing defects, or thermal cycling — these high-pressure zones fail first. The result is exactly what photo documentation captured: a cascading tear pattern propagating from the ridge downward along the hip.
Why Hip and Ridge Damage Is Different
Turbulence Concentration: Wind flowing over a roof creates vortex zones at hips and ridges that exert significantly higher uplift forces than open roof areas.
Multi-Directional Exposure: Hip junctions face wind from multiple directions simultaneously, making single-sided tarping methods ineffective.
Water Channeling: Damaged hip caps no longer direct water away from the seam, allowing rain to penetrate the most structurally complex part of the roof assembly.
Documented Damage Profile
Initial inspection by Harrisburg Restoration technicians identified the following on-site conditions through visual survey and photographic documentation:
| Damage Element | Location | Severity |
|---|---|---|
| Missing architectural shingles | Roof hip — upper third | Complete displacement |
| Compromised ridge caps | Ridge-to-hip junction | Partial loss with lifted edges |
| Exposed nail penetrations | Underlayment surface | Multiple open points |
| Torn shingle tabs | Adjacent field area | Vertical splits along perforation |
| Attic moisture | Interior assessment | No active intrusion at inspection |
Why Fast Response Matters
Wind Damage Progression Timeline
Property Assessment and Scope of Damage
The affected mitigation area covered approximately 100 square feet, concentrated along the roof hip and extending into the ridge intersection. This is a critical geometric region of the roof assembly where conventional flat-tarp methods fail because they cannot accommodate the three-dimensional change in plane direction without creating water-pooling pockets or wind-catch edges.
Why This Damage Pattern Demanded Custom Methodology
A standard polyethylene tarp draped over a roof hip would have created two immediate problems: first, the tarp’s flat geometry would not conform to the hip’s directional change, leaving gaps where rainwater could enter; second, the slick poly surface combined with high-turbulence airflow at the ridge would generate billowing forces capable of dislodging even well-anchored fasteners. The mitigation strategy needed to integrate with the existing roof system rather than simply cover it.
“Standard flat tarping was insufficient. The mitigation material had to be carefully integrated under the existing ridge shingles to create a true shingle-effect water shed.”
Response Strategy
Phase 1: Site Securing and Safety Setup
Before any mitigation material touched the roof, the response crew established fall protection anchorage and deployed extension ladders for safe roof access. Wind-damaged roofs present elevated slip and fall hazards due to loose granules, displaced shingle fragments, and the unpredictable behavior of partially attached materials underfoot. Personal protective equipment included harnesses, helmets, and slip-resistant footwear rated for asphalt shingle surfaces.
Phase 2: Debris Clearing and Surface Preparation
Crews systematically removed loose shingle fragments, displaced ridge caps, and exposed nails from the affected zone. This preparation step is critical for two reasons: protruding nails would puncture the synthetic underlayment during installation, and loose debris left in place would create voids beneath the mitigation material — voids that compromise the integrity of the water seal and accelerate fastener pullout under wind load.
Phase 3: Synthetic Underlayment Installation
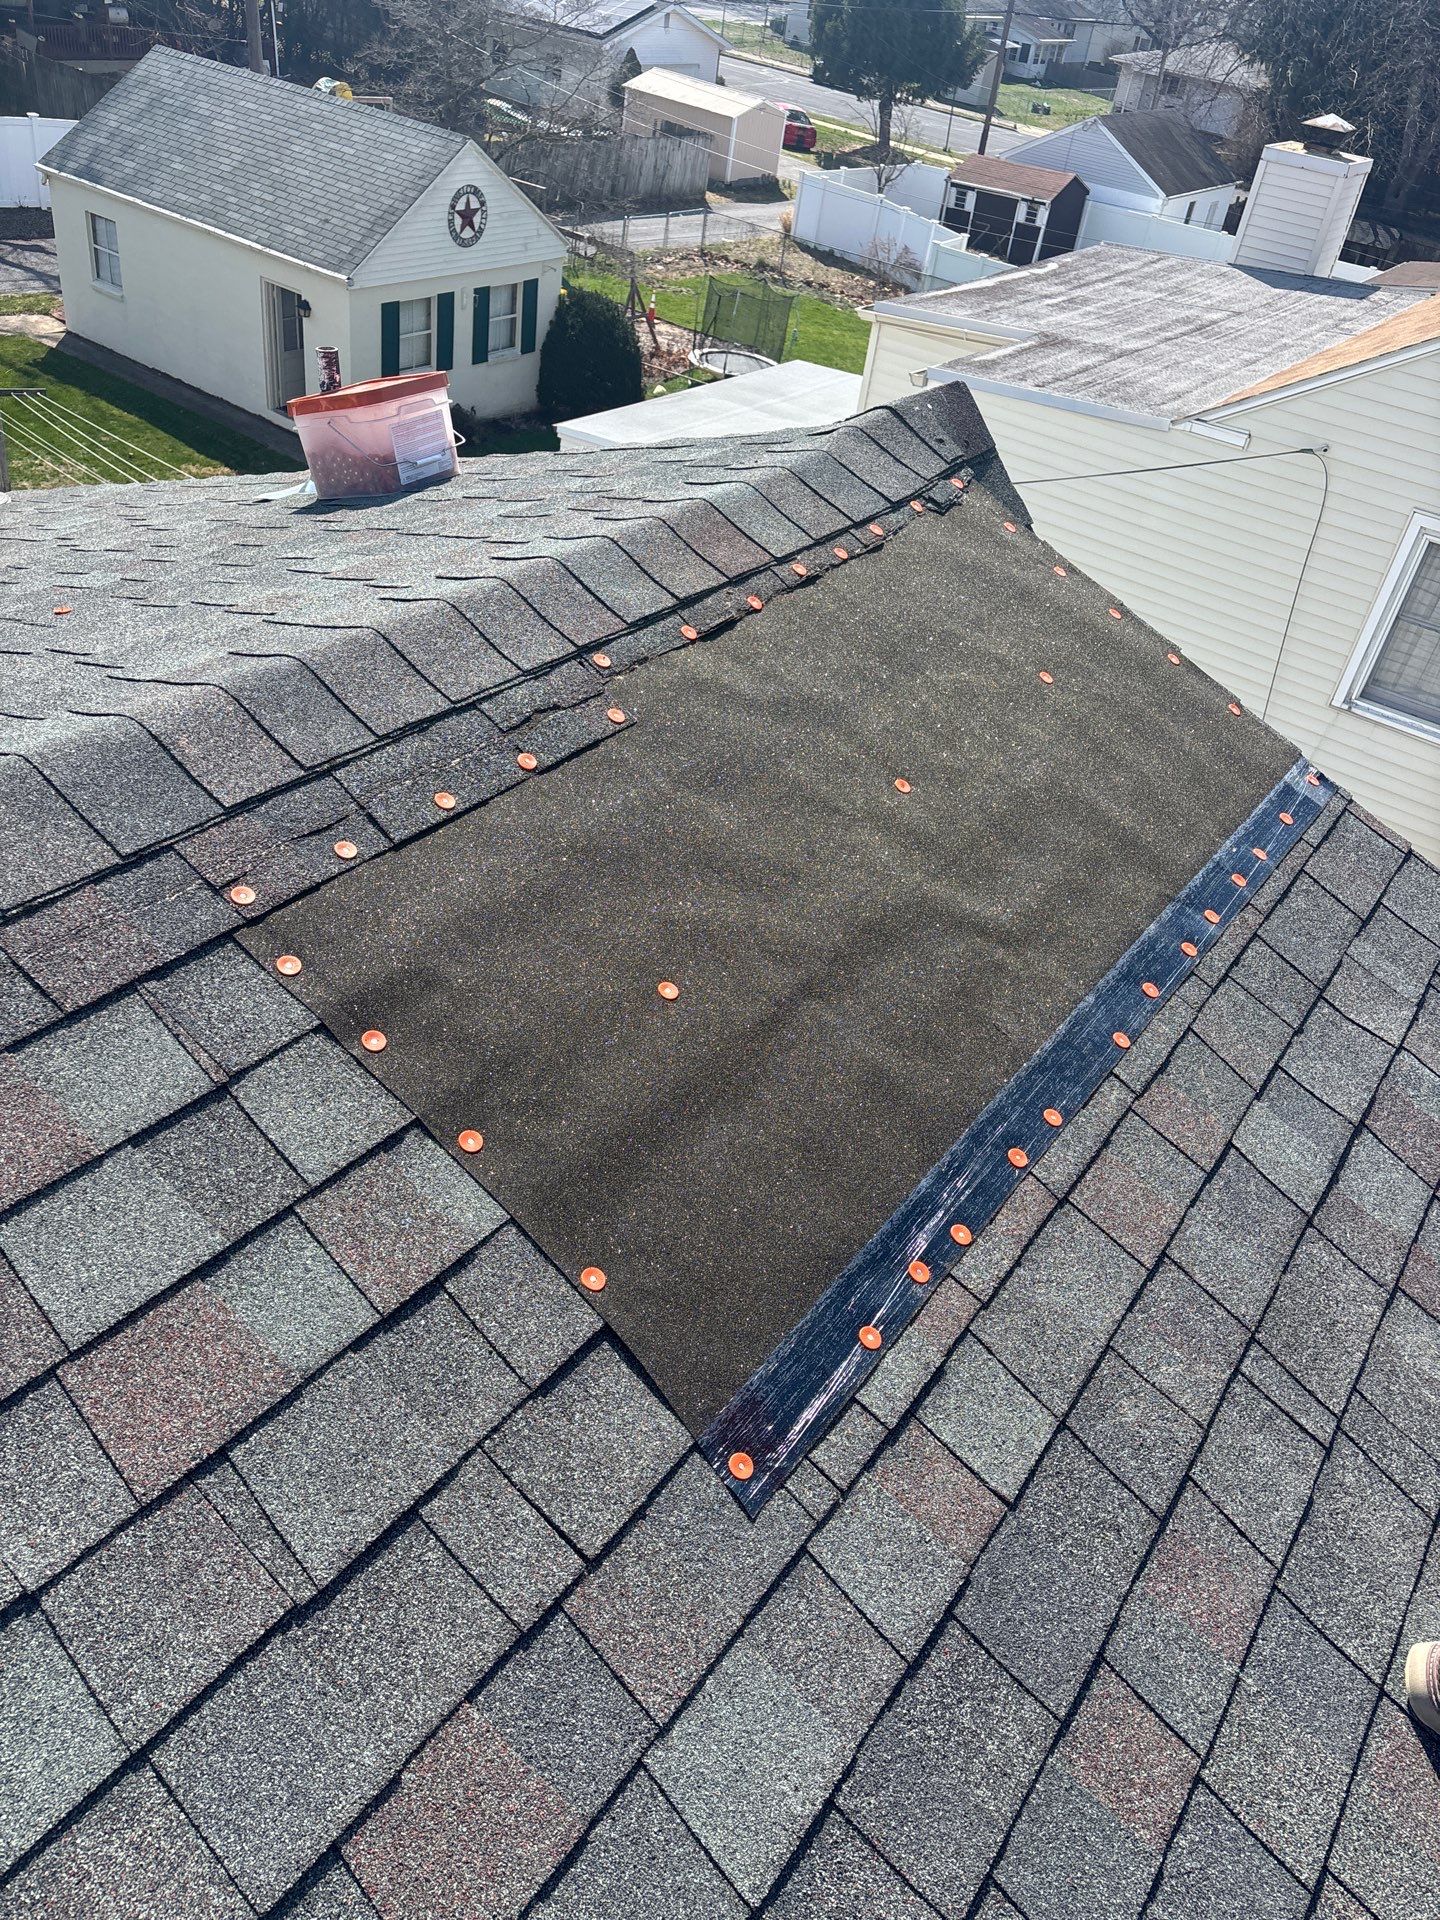
Rather than the traditional blue polyethylene tarp common to emergency roof work, the Harrisburg Restoration crew deployed a high-grip synthetic reinforced underlayment. This material is engineered for residential roofing applications and offers several measurable advantages for hip-and-ridge mitigation scenarios.
Synthetic Underlayment vs Standard Poly Tarp
Durability: Synthetic underlayment withstands extended UV exposure where polyethylene tarps degrade within weeks.
Surface Grip: The textured fabric provides slip resistance for follow-up adjuster inspections and permanent repair crews.
Water Performance: Engineered for direct roof application, the material sheds water without pooling characteristics common to flat tarps.
Wind Resistance: Lower wind-catch profile when properly fastened, reducing the risk of mid-storm detachment.
Emergency Roof Mitigation 5-Step Process
Equipment Deployment Analysis
Emergency roof mitigation requires specialized tools that balance speed of installation against long-term holding power. The equipment package deployed for this Lehigh Valley project reflects best practices refined across thousands of regional storm response projects.
Equipment Inventory
Pneumatic Cap Nailer
The cap nailer drives wide-head plastic-cap roofing nails through the underlayment into the roof decking below. The orange plastic caps visible in the post-mitigation photographs distribute fastener load across approximately one square inch of underlayment surface, dramatically reducing the tearout risk that occurs with standard nails under wind stress.
1-inch cap nails
6-8 inch perimeter, 12 inch field
1 sq inch per cap
Cat 1 sustained
Synthetic Reinforced Underlayment
This engineered material replaces traditional poly tarps with a woven synthetic fabric designed for direct roof exposure. Its reinforced structure resists tear propagation from punctures and remains dimensionally stable across temperature swings — critical for the variable spring weather of the Lehigh Valley.
Synthetic woven fabric
90+ days exposure
~100 sq ft
High-grip, slip-resistant
Perimeter Furring Strips
Wood furring strips installed along the underlayment perimeter create a mechanical clamp that compresses the fabric edge against the existing shingles. This addresses the single greatest failure point for emergency tarps — wind-driven edge lift — by adding redundant mechanical restraint beyond cap nails alone.
Edge clamping
Dimensional lumber
Continuous perimeter
Anti-billow protection
Fall Protection and Access Equipment
Personal fall arrest harnesses, anchored roof anchors, and extension ladders rated for roofing work formed the safety backbone of the project. Utility knives with hook blades allowed precision trimming of the underlayment around the hip geometry without overcutting into adjacent shingles.
ANSI Z359 compliant
Extension, Type IA
Hook-blade utility knives
Temporary structural
Project Data & Analytics
Mitigation Material Comparison
Response Impact: Fast vs Delayed
Common Wind Damage Failure Points in Pennsylvania Roofs
38%
29%
18%
15%
Restoration Timeline and Methodology
The complete mitigation cycle from arrival to attic verification was executed within a single working day, demonstrating the operational discipline required for effective emergency roof response.
Innovative Solutions Applied
The choice of high-grip synthetic underlayment over a conventional polyethylene tarp represents a meaningful upgrade in emergency mitigation practice. Three specific advantages justified the material selection for this project.
Shingle-Effect Integration
By tucking the upper edge of the synthetic underlayment beneath the existing ridge cap shingles, crews created a continuous water-shedding surface that mimics how a properly installed roof system handles rainfall. Water flowing down the ridge cap transitions directly onto the synthetic surface and continues downslope without ever finding a horizontal seam to penetrate.
Walkability for Follow-Up Crews
The textured fabric surface provides genuine traction for adjusters performing damage verification and for the permanent repair crew who will return to install replacement shingles. Standard poly tarps become hazardous slip surfaces when wet, which can delay claims processing and create site safety concerns.
Extended UV Resistance
Where standard blue tarps degrade visibly within two to three weeks of UV exposure, the synthetic underlayment maintains structural integrity for approximately 90 days. This buffer accommodates the realistic timeline for insurance claim approval, material procurement, and weather-appropriate scheduling of permanent repairs — particularly important in the variable spring and fall weather patterns of south-central Pennsylvania.
Mitigation Quality Standards Applied
Material Standard: Synthetic reinforced roofing underlayment rated for direct UV exposure.
Fastener Standard: Wide-cap roofing nails with documented spacing pattern.
Edge Restraint Standard: Continuous perimeter mechanical clamping via furring strips.
Verification Standard: Post-installation attic inspection with photographic documentation.
Lehigh Valley Region: Understanding Local Roof Damage Risks
The Lehigh Valley sits within a meteorological zone that experiences a distinctive mix of weather stressors capable of compromising residential roof systems. Properties in postal code 18103 and surrounding Allentown-area zip codes face exposure to spring thunderstorm wind gusts, summer derecho events, and winter ice-loading cycles — each of which targets specific weaknesses in the roof assembly.
Regional Factors Affecting Roof Damage Risk
Spring Wind Events: April and May routinely deliver thunderstorm complexes producing 50 to 70 mph wind gusts. These events disproportionately target aging shingles where adhesive seals have weakened, with hip and ridge zones absorbing the highest mechanical stress.
Topographic Wind Acceleration: The Lehigh Valley’s position between the Blue Mountain ridge and the Reading Prong creates channeling effects that can locally amplify wind speeds beyond regional forecast values. Homes oriented perpendicular to dominant wind directions experience accelerated shingle aging on their windward roof planes.
Thermal Cycling: Pennsylvania’s pronounced seasonal temperature swings cycle asphalt shingles through expansion and contraction patterns that gradually weaken sealant bonds. Shingles that performed well for 15 years can fail rapidly once their adhesive integrity drops below a critical threshold.
Late-Winter Ice Damage: Ice dam formation at eaves and around penetrations creates back-water conditions that lift shingles from below. Damage often becomes visible only during the next significant wind event months later.
Why Lehigh Valley Property Owners Choose Harrisburg Restoration
Harrisburg Restoration operates as part of the Advanced DRI network, providing emergency mitigation and full restoration services across south-central and northeastern Pennsylvania. The combination of regional crew coverage, IICRC-aligned mitigation protocols, and direct insurance carrier coordination allows property owners to move from emergency stabilization through permanent repair without juggling multiple contractors. For wind damage, fire damage, water intrusion, and mold remediation, the regional response model ensures crews arrive equipped for the actual conditions on site rather than discovering material shortages mid-project.
Outcome and Verification
Post-mitigation verification confirmed the project achieved all primary stabilization objectives. Attic inspection following underlayment installation showed no active leaks, no secondary ceiling saturation, and no moisture penetration through the protected zone. The temporary patch is rated for sustained weather exposure up to 90 days, providing the property owners with sufficient window to complete insurance adjustment, finalize permanent shingle selection, and schedule full roof repair under favorable weather conditions.
| Outcome Metric | Result |
|---|---|
| Active leaks at completion | None detected |
| Secondary interior damage | None detected |
| Weather event resistance rating | Category 1 sustained |
| Temporary patch lifespan | Up to 90 days |
| Same-day completion | Achieved |
| Attic moisture readings | Within normal range |
Key Takeaways
Emergency roof mitigation following wind damage is fundamentally an engineering exercise — not a tarping exercise. The geometry of the damage, the material selection, the fastener pattern, and the integration with the existing roof system all determine whether the mitigation will actually protect the home or simply postpone interior damage by a few days.
This Lehigh Valley project demonstrates how same-day response combined with material upgrades — synthetic underlayment instead of poly tarp, cap nails instead of bare roofing nails, perimeter furring instead of edge-staking — produces a mitigation outcome that buys property owners genuine time. For homeowners in postal code 18103 and across the broader Lehigh Valley service area, Harrisburg Restoration provides the regional response capability that converts a roof emergency into a manageable insurance claim.
To request emergency roof mitigation or schedule storm damage assessment, contact Harrisburg Restoration at (717) 232-5444. The headquarters serving the Lehigh Valley operates from postal code 17111, with regional crew coverage extending across south-central and northeastern Pennsylvania. Learn more about the parent restoration network at advanceddri.com.